About Full Spectrum Conversions:
In conjunction with the monochrome conversion, you can choose to allow all of the IR light to reach the sensor by removing the IR cut filter, or just a narrow portion by using IR filters of certain frequencies. Filters of 720, 760, 850 & 950 nm are very common wavelengths. Some conversions place a small filter with one of these wavelengths just in front of the sensor to limit the response of the sensor. If you place an 850nm filter in front of the sensor, the sensor will only see the wavelengths above that wavelength. The image will only show light reflected from surfaces that have a wavelength of 850nm or above—everything below is filtered out. This is that eerie effect you typically see in IR photography. The problem with this approach is that it greatly cripples your camera to a very narrow band of light. How do you choose? The full spectrum VIS-IR conversion lets in everything! Everything from about 350 nm to 950 nm. You can place a filter of choice for an effect, and then remove it when done.
However, if you do want to limit your camera to one wavelength of IR light, then the appropriate filter can be installed over the sensor. I don’t recommend this because it greatly cripples your camera to a narrow band of light.
Maximum sharpness is achieved from using a IR cut filter, either internal, or external, when there is a large amount of IR light in the scene–during a bright day. The extra IR light that reaches the sensor diminishes sharpness slightly, but increases sensitivity. With the full-spectrum VIS-IR conversion you can choose the wavelength of light that the sensor “sees” to achieve the desired effect by simply placing an IR filter over the lens. You are able to achieve any of the curves in the graph above by using external filters, except the RGB filters to create a color image (actually, you can create a color image with one of these cameras by taking three successive shots using all three filters and combining them in Photoshop, but it is an involved process and is only usable on images that don’t move—you might as well use a color camera at that point if you want a color image).
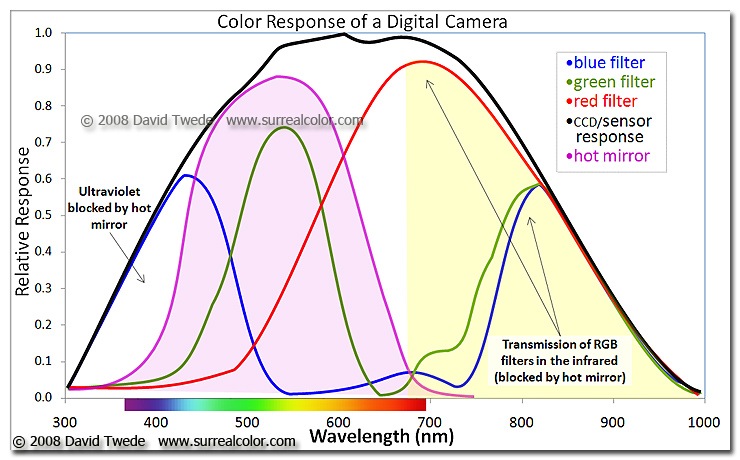
The chart above shows the sensitivity of a typical digital sensor. The vertical axis is the relative amount of light the sensor can see. The horizontal axis is the wavelength of light in nanometers, and the rainbow stripe shows what the typical human eye can perceive. The amount of light the sensor is sensitive to is represented by the black curve. The lavender curve is the spectrum of light the Color Correcting filter, a.k.a. Hot Mirror or IR cut filter, allows through to the sensor to mimic the human eye. This is the limitation the manufacturer builds into the camera by way of filters. Each of the Red, Green and Blue curves shown are what the Color Filter Array (CFA) allows onto the sensor. The total amount of light reaching the sensor is actually the areas under the threeRGB curves collectively. By removing the CFA, sensitivity is increased by allowing everything under the lavender curve to reach the sensor. When the IR cut filter is removed the total amount of light reaching the sensor is now that under the black curve. This is the full spectrum VIS-IR conversion that I can do, and recommend over that of a particular wavelength of IR light, i.e. an IR conversion of 650nm would only allow IR light above that wavelength, 650 – 950nm. With the full spectrum conversion you choose which wavelength of IR light reaches the sensor, and can change the IR filter to suit the subject matter. Then to take standard B&W images, you cover the lens with an IR cut filter, which is represented by the lavender curve above.
A full spectrum conversion gives you all of the options available. So if you want to do some IR photography, go with the full spectrum conversion. And if you don’t have a desire to do IR photography, then leave the IR cut filter in place and use the camera to take B&W images, with higher resolution and increased sensitivity.