Post Processing the Images:
I use Monochrome2DNG, FastRawViewer, Raw Photo Processor, and LightRoom for all of my post processing. I’m of the traditional school that comes from having spent a lot of time in a darkroom. Not to say composting and layering with PhotoShop are bad, I just haven’t ventured in that direction as of yet. I also use some of the NIK software suite. Most of what I state here is with these programs in mind. Everything starts from a RAW file, this extracts maximum detail and information from the scene, and gives more room for adjustments in post processing.
![]() I use Monochrome2DNG to convert my RAW files. All of the standard post processing software see the DNG files converted with this app as a monochrome file, so there are no strange artifacts due to your post processing app thinking it is an RGB file and applying a de-mosaic algorithm to the file. I find it works very well, as do others that have used it. The program will also do batch processing, so converting a day’s shoot is easy. Go to the a7RII(m) sample gallery to download a file converted by Monochrome2DNG and the Sony RAW file and run it through your processor and see how well it works.
I use Monochrome2DNG to convert my RAW files. All of the standard post processing software see the DNG files converted with this app as a monochrome file, so there are no strange artifacts due to your post processing app thinking it is an RGB file and applying a de-mosaic algorithm to the file. I find it works very well, as do others that have used it. The program will also do batch processing, so converting a day’s shoot is easy. Go to the a7RII(m) sample gallery to download a file converted by Monochrome2DNG and the Sony RAW file and run it through your processor and see how well it works.
Another option is Raw Photo Processor (RPP). RPP can be set to process the raw file without applying a de-mosaic algorithm by a simple command line in the Terminal app. Download RPP here, install the app, and then run this line in the Terminal app:
defaults write net.tigry.rpp NoCFA -bool true
You can turn on the color feature of the app again by changing the true portion of that line to false. The app has several de-mosaic algorithms to choose from for when you want to work in the color world. The app comes with a manual that is quite good, and a plugin for Lightroom when you contribute. You should read the manual to learn about the details of the program. I find that with the full size sensors LR does a pretty good job on these monochrome files even though it processes it as a color image.
 If you don’t use one of the apps above, you’ll need to remove the magenta color cast. The color cast is due to the camera’s processor thinking that it sees in color. Simply slide the saturation slider to the left in most any image processor. The Sony app that comes with the camera can be used also.
If you like to tint your images, you can use the split tone adjustments in LR. The only thing you will not be able to do is use the Hue, Saturation & Luminance sliders to colorize an image, since there is no color in the RAW file. As far as PhotoShop goes, I don’t have any information because I don’t use the program. I imagine that you can do all of this and more.
You can create a preset in either Lightroom or Photoshop (or most any editing software) to remove the color cast during import, or use a batch process. I have a preset in LR that removes the color cast by sliding the saturation slider to zero, and then it adds some minimal sharpening. I will use RPP from within LR to convert the images that I want to print to paper to achieve the finest details. I’m currently setting up an Epson 7900 to use with the Piezogrophy print system. I’ve seen prints made with this system first hand, and they are amazing.
At this point you should have a TIFF file that was converted with RPP or Monochrome2DNG, or the RAW file with the color cast removed using another photo processor. From here you simply adjust as usual. You will find that the images are more robust—for lack of a better term—, and you can apply more effect without causing unnatural looking images—use your own judgment here, it’s your image. The beauty of a RAW file is that you can adjust all you want and then start over by going back to when you imported without altering the original file. It truly is like a negative in that regard.

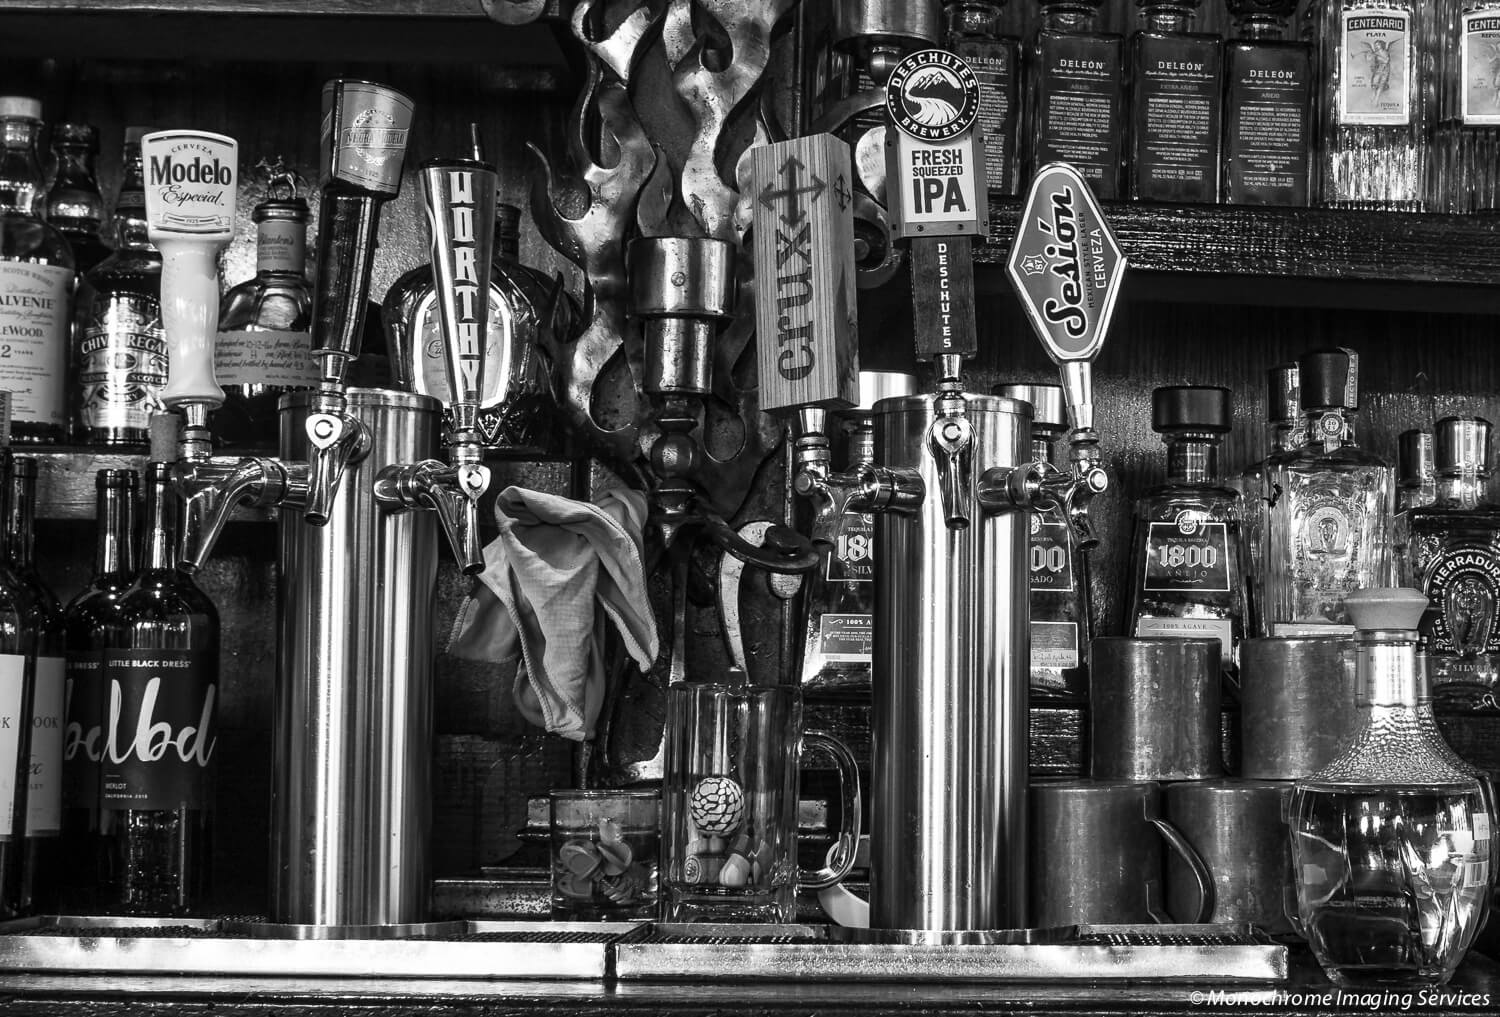
30% crop of original image, Sony a7(m), Nikon 28mm 1:1.4 @ ƒ 4, 1/30 sec, ISO 100
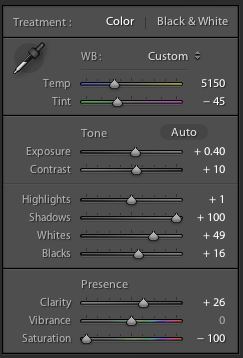
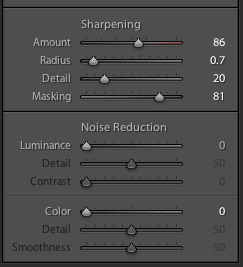
The two images above show what can be done using adjustments on a monochrome RAW image. The screen shots below show the adjustments to the after image within Lightroom. The before image had only the exposure adjusted to +1 to match that of the after image. The image is probably a bit too contrasty for my taste, but the punch in contrast seems to suit the image content. These adjustments were pushed hard to demonstrate the resiliency of the converted files. This image is a 30% crop of the full image file.
Next subject: Printing